Implementing Authentication in ASP.NET Core Web APIs

By Kevin Campusano
June 17, 2022

Authentication is a complex space. There are many problem scenarios and many more solutions. When it comes to Web APIs written with ASP.NET Core, there are various fully featured options like Duende IdentityServer or Azure Active Directory. These promise to be “everything but the kitchen sink” solutions which are robust and allow you to deal with many complex requirements.
But what if our requirements dictate that we need something simpler? Do we have to roll out our own from scratch? Or does ASP.NET Core offer smaller, customizable, somewhat independent puzzle pieces that we can put together without having to write all the code ourselves and still have a good amount of control?
Spoiler alert: The answer to that last question is yes. And we’re going to talk about it in this very article.
There is a Table of contents at the end of this post.
Two approaches to authentication: JWT and API Keys
In this article, we’ll take an existing ASP.NET Core Web API and add authentication capabilities to it. Specifically, we’ll support two authentication schemes commonly used for Web APIs: JWT and API Keys. Also, we will use our own database for storage of user accounts and credentials.
The project that we will work with is a simple ASP.NET Web API backed by a Postgres database. It has a few endpoints for CRUDing automotive related data and for calculating values of vehicles based on various aspects of them. You can read all about the process of building it here. I also added a few database integration tests for it here.
You can find it on GitHub. If you’d like to follow along, clone the repository and checkout this commit: cd290c765fcd2c6693008d3dc76fa931098dcaa0. It represents the project as it was before applying all the changes from this article.
You can follow the instructions in the project’s README file in order to get the app up and running.
Managing user accounts with ASP.NET Core Identity
Let’s deal first with the requirement of storing the user accounts in our own database.
Luckily for us, ASP.NET Core provides us with Identity. This is an API that offers a comprehensive solution for authentication. It can connect with the aforementioned Duende IdentityServer for OpenID Connect and OAuth 2.0, supports authentication via third parties like Facebook or Google, and can fully integrate with user interfaces on web apps, complete with scaffolding/autogeneration capabilities too.
Most importantly for us, it supports management of user accounts stored in our own database. It includes data for third party logins, passwords, roles for authorization, email confirmation, access tokens, etc.
That’s a lot of of functionality baked in there. But we don’t need all that, so let’s see how we can take only the bits and pieces that we need in order to fulfill our specific requirements.
Specifically, we want:
- Tables in our database for storage of user accounts and passwords.
- A programmatic way to create, fetch and validate users using those tables.
It’s actually pretty simple.
Install the necessary NuGet packages
First, we need to install a couple of NuGet packages:
- Microsoft.AspNetCore.Identity which contains the core library.
- Microsoft.AspNetCore.Identity.EntityFrameworkCore which includes the classes that Identity needs in order to properly interact with Entity Framework, which is what we’re using in our Web API for interfacing with the database.
We can install them by running these two commands from the VehicleQuotes directory:
$ dotnet add package Microsoft.AspNetCore.Identity
$ dotnet add package Microsoft.AspNetCore.Identity.EntityFrameworkCore
That will add the following lines to the VehicleQuotes/VehicleQuotes.csproj project file:
 <Project Sdk="Microsoft.NET.Sdk.Web">
   ...
   <ItemGroup>
     ...
+    <PackageReference Include="Microsoft.AspNetCore.Identity" Version="2.2.0" />
+    <PackageReference Include="Microsoft.AspNetCore.Identity.EntityFrameworkCore" Version="6.0.5" />
     ...
   </ItemGroup>
 </Project>
Update the DbContext to include the Identity tables
Next step is to configure our DbContext class so that it includes the new tables that we need from the Identity library. So let’s go to VehicleQuotes/Data/VehicleQuotesContext.cs and update it to do so.
We need to include these new using statements at the top of the file so that we have access to the classes that we need from the NuGet packages we just installed:
using Microsoft.AspNetCore.Identity;
using Microsoft.AspNetCore.Identity.EntityFrameworkCore;
Next, instead of DbContext, the VehicleQuotesContext class should inherit from IdentityUserContext<IdentityUser>.
IdentityUserContext is a class provided by ASP.NET Core Identity that’s designed so that our DbContext can inherit from it and gain user management functionality. Namely, it includes a new DbSet (and consequently, a table) for holding user accounts (aptly named Users), among other things that we won’t need.
IdentityUserContexthas a more feature rich counterpart calledIdentityDbContext, which also includesDbSets to support roles based authorization. We don’t need all that so we use its simpler cousin. Feel free to explore the source code on GitHub to see all it offers.
The generic type parameter that we give it, IdentityUser, is a class that’s also provided by the Identity library. Its purpose is to serve as a default Entity Type for our user model and, as a consequence, our Users DbSet.
In summary, by having our DbContext class inherit from IdentityUserContext<IdentityUser>, we’re telling Identity that we want it to augment our DbContext (and database) to include the core user management tables and that we want our users table to have the same columns as IdentityUser.
If we wanted to include more columns in our users table, what we would have to do is create a new class, make it inherit from
IdentityUser, define any additional fields that we want on it, and use that class as a type parameter toIdentityUserContext. For us for now, the default works just fine. You can learn more about customizing Identity in the official docs.
The change looks like this:
-public class VehicleQuotesContext : DbContext
+public class VehicleQuotesContext : IdentityUserContext<IdentityUser>
Finally, IdentityUserContext has some logic that it needs to run when it is being created. In order to allow it to run that logic, let’s add the following line to our VehicleQuotesContext’s OnModelCreating method:
 protected override void OnModelCreating(ModelBuilder modelBuilder)
 {
+    base.OnModelCreating(modelBuilder);
     // ...
 }
This calls IdentityUserContext’s own OnModelCreating implementation so that it can set itself up properly.
The complete file should be looking like this now:
using Microsoft.AspNetCore.Identity;
using Microsoft.AspNetCore.Identity.EntityFrameworkCore;
using Microsoft.EntityFrameworkCore;
using VehicleQuotes.Models;

namespace VehicleQuotes
{
    public class VehicleQuotesContext : IdentityUserContext<IdentityUser>
    {
        public VehicleQuotesContext (DbContextOptions<VehicleQuotesContext> options)
            : base(options)
        {
        }

        public DbSet<Make> Makes { get; set; }
        public DbSet<Size> Sizes { get; set; }
        public DbSet<BodyType> BodyTypes { get; set; }

        public DbSet<Model> Models { get; set; }
        public DbSet<ModelStyle> ModelStyles { get; set; }
        public DbSet<ModelStyleYear> ModelStyleYears { get; set; }

        public DbSet<QuoteRule> QuoteRules { get; set; }
        public DbSet<QuoteOverride> QuoteOverides { get; set; }

        public DbSet<Quote> Quotes { get; set; }

        protected override void OnModelCreating(ModelBuilder modelBuilder)
        {
            base.OnModelCreating(modelBuilder);

            modelBuilder.Entity<Size>().HasData(
                new Size { ID = 1, Name = "Subcompact" },
                new Size { ID = 2, Name = "Compact" },
                new Size { ID = 3, Name = "Mid Size" },
                new Size { ID = 5, Name = "Full Size" }
            );

            modelBuilder.Entity<BodyType>().HasData(
                new BodyType { ID = 1, Name = "Coupe" },
                new BodyType { ID = 2, Name = "Sedan" },
                new BodyType { ID = 3, Name = "Hatchback" },
                new BodyType { ID = 4, Name = "Wagon" },
                new BodyType { ID = 5, Name = "Convertible" },
                new BodyType { ID = 6, Name = "SUV" },
                new BodyType { ID = 7, Name = "Truck" },
                new BodyType { ID = 8, Name = "Mini Van" },
                new BodyType { ID = 9, Name = "Roadster" }
            );
        }
    }
}
Applying database changes
The Users DbSet that we added into our data model by inheriting from IdentityUserContext<IdentityUser> will become a table once we create and apply a database migration. That’s what we will do next.
That’s simple in ASP.NET Core. All we need to do is run a command like this:
dotnet ef migrations add AddIdentityTables
That should produce a new migration file named something like 20220605003253_AddIdentityTables.cs. If you explore it, you’ll see how it contains the definitions for a few new database tables. Including the one that we want: AspNetUsers. That’s the one that we will use to store our user account records.
Next, we apply the migration with:
dotnet ef database update
If you now connect to the database, you’ll see the new tables in there.
If you have the database running in a Docker container like we discussed in the beginning of the article, you should be able to connect to it with:
$ psql -h localhost -U vehicle_quotes
Then, to see the tables:
vehicle_quotes=# \dt
                    List of relations
 Schema |         Name          | Type  |     Owner
--------+-----------------------+-------+----------------
 public | AspNetUserClaims      | table | vehicle_quotes
 public | AspNetUserLogins      | table | vehicle_quotes
 public | AspNetUserTokens      | table | vehicle_quotes
 public | AspNetUsers           | table | vehicle_quotes
 ...
(14 rows)
And that’s pretty much it when it comes to having a sensible storage for user accounts. That was pretty inexpensive, wasn’t it? All we had to do was install some NuGet packages, tweak our existing DbContext, and run some migrations.
The best thing is that we’re not done yet. We can also take advantage of ASP.NET Core Identity to manage users programmatically. Instead of interacting with these tables directly, we will use the service classes provided by Identity to create new users, fetch existing ones and validate their credentials.
Before we can do that though, we must first do some configuration in our app’s Startup class so that said services are properly set up to our liking and are made available to our application.
Configuring the Identity services
We need to add some code to VehicleQuotes/Startup.cs. With it, we configure the Identity system and add a few service classes to ASP.NET Core’s IoC container so that they are available to our app via Dependency Injection.
We need a new using statement:
using Microsoft.AspNetCore.Identity;
And the following code added to the ConfigureServices method:
services
    .AddIdentityCore<IdentityUser>(options => {
        options.SignIn.RequireConfirmedAccount = false;
        options.User.RequireUniqueEmail = true;
        options.Password.RequireDigit = false;
        options.Password.RequiredLength = 6;
        options.Password.RequireNonAlphanumeric = false;
        options.Password.RequireUppercase = false;
        options.Password.RequireLowercase = false;
    })
    .AddEntityFrameworkStores<VehicleQuotesContext>();
The call to AddIdentityCore makes several Identity utility classes available to the application. Among those, UserManager is the only one we will use. We will use it later to… well, manage users. You can also see how we’ve set a few options related to how the user accounts are handled. options.SignIn.RequireConfirmedAccount controls whether new accounts need to be confirmed via email before they are available. With options.User.RequireUniqueEmail, we tell Identity to enforce uniqueness of emails on user accounts. And finally the options.Password.* options configure the password strength requirements.
You can explore all the available options in the official docs.
Then, the call to AddEntityFrameworkStores tells the Identity system that it should use our VehicleQuotesContext for data storage.
Creating users
With that configuration out of the way, we can now write some code to create new user accounts. To keep things simple, we’ll add a new UsersController to our project that will expose a new endpoint that offers that functionality.
Let’s start with this in VehicleQuotes/Controllers/UsersController.cs:
using Microsoft.AspNetCore.Identity;
using Microsoft.AspNetCore.Mvc;

namespace VehicleQuotes.Controllers
{
    [Route("api/[controller]")]
    [ApiController]
    public class UsersController : ControllerBase
    {
        private readonly UserManager<IdentityUser> _userManager;

        public UsersController(
            UserManager<IdentityUser> userManager
        ) {
            _userManager = userManager;
        }
    }
}
As you can see, this controller defines a dependency on UserManager<IdentityUser>, an instance of which is injected via the constructor. This is one of the classes made available to us when we configured the Identity core services in our app’s Startup. We will use it to create new user records.
Before that though, we need to define a new class that encapsulates the payload for a request to our endpoint. When it comes to creating user accounts, all we need is a username, a password, and an email. As such, we add the following class in a new VehicleQuotes/ResourceModels/User.cs file:
using System.ComponentModel.DataAnnotations;

namespace VehicleQuotes.ResourceModels
{
    public class User
    {
        [Required]
        public string UserName { get; set; }
        [Required]
        public string Password { get; set; }
        [Required]
        public string Email { get; set; }
    }
}
Now, we shall use this type as the parameter for a new PostUser action method in the UserController which will expose the new user account creation endpoint in our API. The method looks like this:
// POST: api/Users
[HttpPost]
public async Task<ActionResult<User>> PostUser(User user)
{
    if (!ModelState.IsValid)
    {
        return BadRequest(ModelState);
    }

    var result = await _userManager.CreateAsync(
        new IdentityUser() { UserName = user.UserName, Email = user.Email },
        user.Password
    );

    if (!result.Succeeded)
    {
        return BadRequest(result.Errors);
    }

    user.Password = null;
    return Created("", user);
}
Be sure to also add the following using statements:
using System.Threading.Tasks;
using VehicleQuotes.ResourceModels;
System.Threading.Tasks allows us to reference the class Task<> which is the return type of the new PostUser method. VehicleQuotes.ResourceModels is where our new User class lives.
Thanks to the instance of UserManager<IdentityUser> that we’re holding onto, this method is very straightforward. The most interesting portion is this:
var result = await _userManager.CreateAsync(
    new IdentityUser() { UserName = user.UserName, Email = user.Email },
    user.Password
);
Here we’re newing up an IdentityUser instance using the given request parameters and passing it on to UserManager<IdentityUser>’s CreateAsync method, along with the password that was also given in the incoming request. This puts the Identity system to work for us and properly create a new user account.
Then, we can inspect its return value (which we capture in the result variable) to determine if the operation was successful. That way we can respond appropriately to our API’s caller.
Finally, with…
user.Password = null;
return Created("", user);
we return the data representing the newly created user account but we’re discreet and make sure not to include the password.
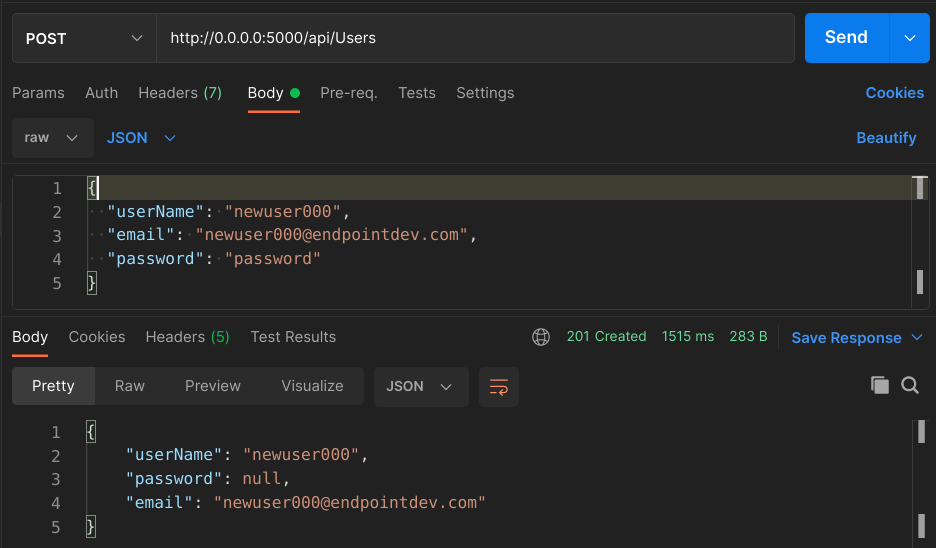
With that, we can test our API. Fire it up with dotnet run (or dotnet watch!) and send a POST request to our new endpoint at http://0.0.0.0:5000/api/Users with a payload like this:
{
  "userName": "newuser000",
  "email": "newuser000@endpointdev.com",
  "password": "password"
}
I just tried it in Postman and this is what it looked like:
Feel free to test it out further. Try repeated emails or usernames. Try passwords that don’t meet the criteria we defined when configuring Identity in the app’s Startup class. It all works as you’d expect.
You can inspect the database and see the newly created record too:
vehicle_quotes=# select id, user_name, email, password_hash from "AspNetUsers";
-[ RECORD 1 ]-+--------------------------------------
id            | aaad07b4-f109-4255-8caa-185fd7694c72
user_name     | newuser000
email         | newuser000@endpointdev.com
password_hash | AQAAAAEAACcQAAAAEJJTV7M2Ejqd3K3iC...
And there it is, that’s our record. With a hashed password and everything.
Now let’s see what would an endpoint to fetch users look like:
Fetching users
UserManager<IdentityUser> offers a FindByNameAsync method that we can use to retrieve users by name. We can add a new endpoint that leverages it like so:
// GET: api/Users/username
[HttpGet("{username}")]
public async Task<ActionResult<User>> GetUser(string username)
{
    IdentityUser user = await _userManager.FindByNameAsync(username);

    if (user == null)
    {
        return NotFound();
    }

    return new User
    {
        UserName = user.UserName,
        Email = user.Email
    };
}
This is even more straightforward than the previous one. We just call the FindByNameAsync method by giving it the username of the account we want, make sure that we actually found it, and then return the data.
For the response, we use the same User class that we created to represent the input for the creation endpoint. If we added more fields to the user profile, we could include them here. Alas, we only have username and email for now.
Restart the app and we can now make a request like this:
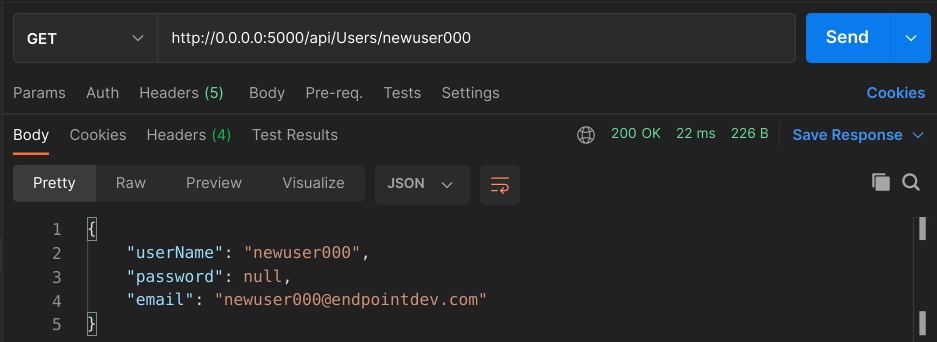
Pretty neat, huh? Try a username that does not exist and you should see the API respond with a 404.
One quick improvement that we can do before we move on: let’s change
PostUser’s return statement to this:return CreatedAtAction("GetUser", new { username = user.UserName }, user);All that does is include a
Locationheader on the POST Users endpoint’s response that contains the URL for the newly created user. That’s just being a good citizen.
Implementing JWT Bearer Token authentication
Now that we have the user management capabilities that we need, let’s implement some actual authentication. We will start by adding JWT-based authentication to our API.
The strategy that we will use is to create a new API endpoint that clients can POST credentials to and that will respond to them with a fresh, short-lived token. They will then be able to use that token for subsequent requests by including it via headers.
We will pick a random endpoint to secure, just to serve as an example. That is, an endpoint that requires authentication in order to be accessed. GET api/BodyTypes is a good candidate. It is defined in VehicleQuotes/Controllers/BodyTypesController.cs’s GetBodyTypes action method. Feel free to test it out.
Creating tokens
Let’s start by creating the new endpoint that clients will call to obtain the auth tokens. In order to do so, we need a few things:
- A class that represents incoming request data.
- A class that represents outgoing response data.
- A class that can generate tokens for a given user.
- A new action method in
UsersControllerthat does the work.
The request data structure
To deal with step one, let’s define a new class in VehicleQuotes/ResourceModels/AuthenticationRequest.cs that looks like this:
using System.ComponentModel.DataAnnotations;

namespace VehicleQuotes.ResourceModels
{
    public class AuthenticationRequest
    {
        [Required]
        public string UserName { get; set; }
        [Required]
        public string Password { get; set; }
    }
}
All users need to authenticate is provide a set of credentials: username and password. So we have this class that contains fields for both and that will be used as input for our endpoint.
The response data structure
Next, we need to define a class to represent that endpoint’s response. I’ve added the following class in VehicleQuotes/ResourceModels/AuthenticationResponse.cs:
using System;

namespace VehicleQuotes.ResourceModels
{
    public class AuthenticationResponse
    {
        public string Token { get; set; }
        public DateTime Expiration { get; set; }
    }
}
Just a simple data structure containing the token itself and a date letting clients know when they can expect it to expire.
The class that creates JWTs
Step 3 is creating a class that can produce the tokens. This is the most interesting part in terms of complexity. Before we can do that though, let’s add the following configurations to VehicleQuotes/appsettings.json:
  "Jwt": {
    "Key": "this is the secret key for the jwt, it must be kept secure",
    "Issuer": "vehiclequotes.endpointdev.com",
    "Audience": "vehiclequotes.endpointdev.com",
    "Subject": "JWT for vehiclequotes.endpointdev.com"
  },
These are values that we’ll need when creating the tokens. We’ll go over the purpose of each them as they come up as we continue writing our code.
Here we’ll gloss over some details on the inner workings of JWTs as a standard. You can learn more about them at jwt.io.
For now, let’s add the following class in VehicleQuotes/Services/JwtService.cs:
using System;
using System.IdentityModel.Tokens.Jwt;
using System.Security.Claims;
using System.Text;
using Microsoft.AspNetCore.Identity;
using Microsoft.Extensions.Configuration;
using Microsoft.IdentityModel.Tokens;
using VehicleQuotes.ResourceModels;

namespace VehicleQuotes.Services
{
    public class JwtService
    {
        private const int EXPIRATION_MINUTES = 1;

        private readonly IConfiguration _configuration;

        public JwtService(IConfiguration configuration)
        {
            _configuration = configuration;
        }

        public AuthenticationResponse CreateToken(IdentityUser user)
        {
            var expiration = DateTime.UtcNow.AddMinutes(EXPIRATION_MINUTES);

            var token = CreateJwtToken(
                CreateClaims(user),
                CreateSigningCredentials(),
                expiration
            );

            var tokenHandler = new JwtSecurityTokenHandler();

            return new AuthenticationResponse {
                Token = tokenHandler.WriteToken(token),
                Expiration = expiration
            };
        }

        private JwtSecurityToken CreateJwtToken(Claim[] claims, SigningCredentials credentials, DateTime expiration) =>
            new JwtSecurityToken(
                _configuration["Jwt:Issuer"],
                _configuration["Jwt:Audience"],
                claims,
                expires: expiration,
                signingCredentials: credentials
            );

        private Claim[] CreateClaims(IdentityUser user) =>
            new[] {
                new Claim(JwtRegisteredClaimNames.Sub, _configuration["Jwt:Subject"]),
                new Claim(JwtRegisteredClaimNames.Jti, Guid.NewGuid().ToString()),
                new Claim(JwtRegisteredClaimNames.Iat, DateTime.UtcNow.ToString()),
                new Claim(ClaimTypes.NameIdentifier, user.Id),
                new Claim(ClaimTypes.Name, user.UserName),
                new Claim(ClaimTypes.Email, user.Email)
            };

        private SigningCredentials CreateSigningCredentials() =>
            new SigningCredentials(
                new SymmetricSecurityKey(
                    Encoding.UTF8.GetBytes(_configuration["Jwt:Key"])
                ),
                SecurityAlgorithms.HmacSha256
            );
    }
}
The CreateToken method is the element that’s most worth discussing here. It receives an instance of IdentityUser as a parameter (which, remember, is the entity class that represents our user accounts), uses it to construct a JWT, and returns it within a AuthenticationResponse object (which is what we decided that our endpoint would return). To do so, we use various classes built into .NET.
The main class that represents the JWT is JwtSecurityToken. We new up one of those in the CreateJwtToken method with this call:
new JwtSecurityToken (
    _configuration["Jwt:Issuer"],
    _configuration["Jwt:Audience"],
    claims,
    expires: expiration,
    signingCredentials: credentials
);
“Issuer” and “Audience” are two important values for how JWTs work. They specify which entity is creating the token (i.e. the “Issuer”) and which entity is the token intended for (i.e. the “Audience”). We use the IConfiguration instance that we got as a dependency to fetch their values from the VehicleQuotes/appsettings.json file.
The “Issuer” and “Audience” parameters in
JwtSecurityToken’s constructor correspond to JWT claimsissandaud, respectively. You can learn more about them and other claims in the RFC.
The next parameter that JwtSecurityToken’s constructor needs is the claims array. In JWT terms, a claim is essentially a statement about the entity for which the token is generated, some data that identifies it. For example, if we’re generating a token for a user, what you would expect to see in such a token’s claims are things like username, email, and any other non-secret profile info.
In our case, as you can see in the CreateClaims method, we add a number of claims:
new[] {
    new Claim(JwtRegisteredClaimNames.Sub, _configuration["Jwt:Subject"]),
    new Claim(JwtRegisteredClaimNames.Jti, Guid.NewGuid().ToString()),
    new Claim(JwtRegisteredClaimNames.Iat, DateTime.UtcNow.ToString()),
    new Claim(ClaimTypes.NameIdentifier, user.Id),
    new Claim(ClaimTypes.Name, user.UserName),
    new Claim(ClaimTypes.Email, user.Email)
};
Along with the user id, name and email, we also add sub, jti and iat claims. These are standardized claims of which you can learn more about in the RFC. The data that we put in here will make its way into the encoded token that our API caller eventually sees. We’ll see that later.
The next parameter to JwtSecurityToken is the expiration date of the token. Here we are setting it to just one minute in the future to comply with our original requirement that the token should be short-lived so that it only allows a handful of requests over a short period of time.
Finally there’s the signingCredentials parameter which tells the JwtSecurityToken how to cryptographically sign the token. As you can see in the code:
new SigningCredentials(
    new SymmetricSecurityKey(
        Encoding.UTF8.GetBytes(_configuration["Jwt:Key"])
    ),
    SecurityAlgorithms.HmacSha256
);
That’s a SigningCredentials instance that we create using the “key” that we have configured in VehicleQuotes/appsettings.json, along with the algorithm to use to produce it.
And that’s about it. There isn’t much else to this class. It is somewhat involved but that’s just how JWTs are created in .NET.
The action method that puts it all together
Now all we need to do is actually create an endpoint that exposes this functionality to clients. Since we have the core logic encapsulated in our JwtService class, the actual action method is simple. Here are the changes that we need to make in order to implement it:
First, on VehicleQuotes/Controllers/UsersController.cs, we add a new using statement so that we can reference our new JwtService class:
using VehicleQuotes.Services;
Next, we declare a new parameter of type JwtService in the controller’s constructor so that we signal to ASP.NET Core’s Dependency Injection subsystem that we want to use one of those. We also hold onto it via a new instance variable called _jwtService:
 // ...
 public class UsersController : ControllerBase
 {
     private readonly UserManager<IdentityUser> _userManager;
+    private readonly JwtService _jwtService;

     public UsersController(
         UserManager<IdentityUser> userManager,
+        JwtService jwtService
     ) {
         _userManager = userManager;
+        _jwtService = jwtService;
     }
     // ...
 }
We also need to tell ASP.NET Core that JwtService should be available for Dependency Injection. To do so, we can add this line in VehicleQuotes/Startup.cs’s ConfigureServices method:
services.AddScoped<Services.JwtService>();
Note that this way of defining dependencies is not recommended and only done this way here to keep things simple for an illustrative app that’s never going to run in production. Ideally what you want to do here is define the dependency as an abstraction (i.e. an interface) and a concrete implementation that fulfills it. For example:
services.AddScoped<ITokenCreationService, JwtService>();This way, classes that depend on this service can reference the interface, not the concrete type. In doing that, they adhere to the Dependency Inversion principle and become more easily testable because they allow mocks to be provided as dependencies.
Finally, we write the actual action method:
// POST: api/Users/BearerToken
[HttpPost("BearerToken")]
public async Task<ActionResult<AuthenticationResponse>> CreateBearerToken(AuthenticationRequest request)
{
    if (!ModelState.IsValid)
    {
        return BadRequest("Bad credentials");
    }

    var user = await _userManager.FindByNameAsync(request.UserName);

    if (user == null)
    {
        return BadRequest("Bad credentials");
    }

    var isPasswordValid = await _userManager.CheckPasswordAsync(user, request.Password);

    if (!isPasswordValid)
    {
        return BadRequest("Bad credentials");
    }

    var token = _jwtService.CreateToken(user);

    return Ok(token);
}
Here too we’re leveraging the UserManager instance that ASP.NET Core Identity so graciously provided us with. In summary, we find the user account by name using the incoming request data, check if the given password is correct, then ask our JwtService to create a token for this user, and finally return it wrapped in a 200 response.
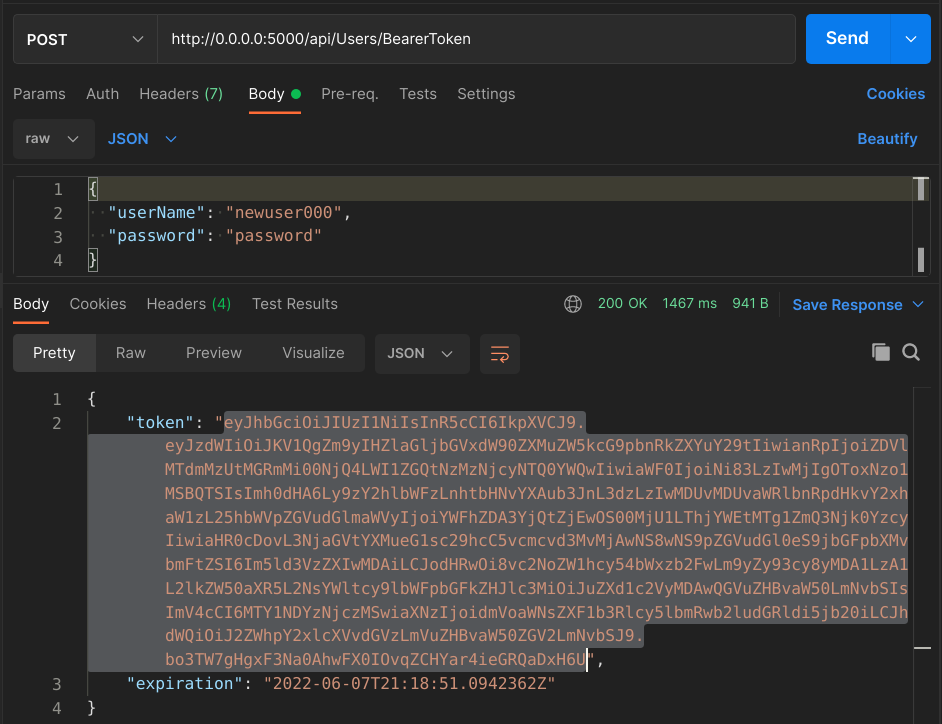
If you hit that endpoint with a POST and a set of existing credentials, you should see something like this:
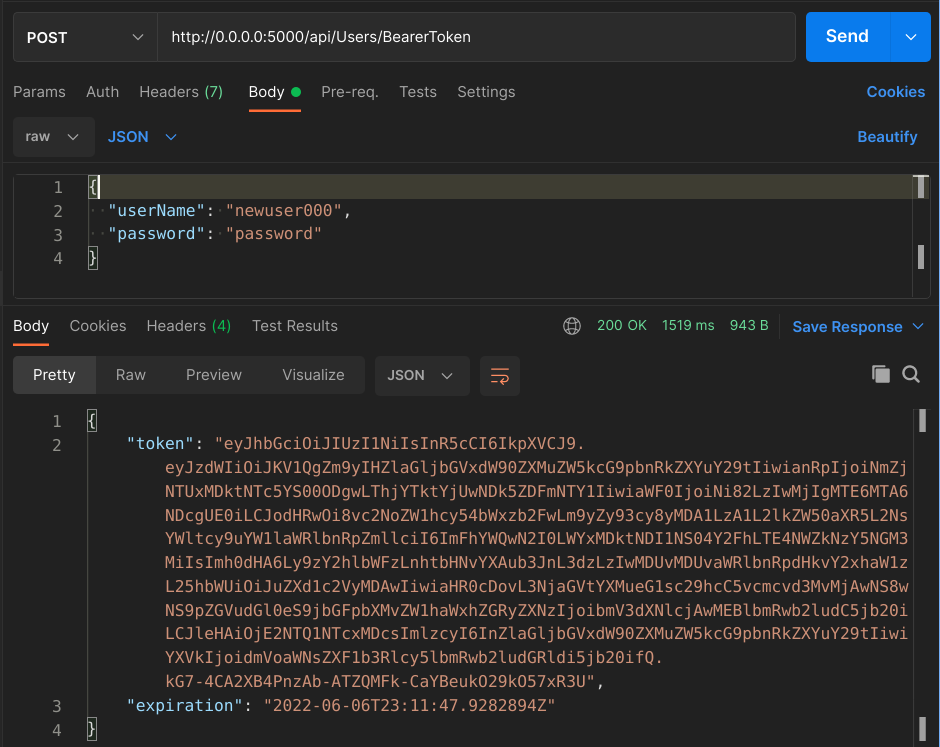
If you take that big string that came back in the "token" field in the response JSON, and paste it in jwt.io’s token decoder, you should be able to see all the claims that we added to the token:

Notice that the keywords here are “Encoded” and “Decoded”. The claims that we put in our JWTs are not protected in any way. As such, we should never put secrets in there.
Securing an endpoint with JWT authentication
Now that we have a way for obtaining tokens, let’s see how we can actually use them to gain access to some resources. To demonstrate that, let’s secure an endpoint in a way that it denies unauthenticated requests.
Applying the Authorize attribute
First we need to signal ASP.NET Core that the endpoint requires auth. We do that by annotating the corresponding action method with the Authorize attribute. We’ve already decided that we were going to use VehicleQuotes/Controllers/BodyTypesController.cs’s GetBodyTypes method as a guinea pig. So, let’s go into that file and add the following using statement:
using Microsoft.AspNetCore.Authorization;
That will allow us access to the attribute, which we can apply to the action method like so:
 // GET: api/BodyTypes
+ [Authorize]
  [HttpGet]
  public async Task<ActionResult<IEnumerable<BodyType>>> GetBodyTypes()
  {
      return await _context.BodyTypes.ToListAsync();
  }
With this, we’ve told ASP.NET Core that we want it to require auth for this endpoint.
Enabling and configuring the JWT authentication
Now, we need to tell it how to actually perform the check. To do that, we need to install the Microsoft.AspNetCore.Authentication.JwtBearer NuGet package. We can do that from the VehicleQuotes directory with the following command:
$ dotnet add package Microsoft.AspNetCore.Authentication.JwtBearer
Once we have that installed, we get access to additional services which we can use to configure the “JwtBearer” authentication scheme. As usual, we do the configuration in VehicleQuotes/Startup.cs’s. Here’s what we need to do:
Add a few new using statements:
using Microsoft.AspNetCore.Authentication.JwtBearer;
using Microsoft.IdentityModel.Tokens;
using System.Text;
Add the following code at the end of the ConfigureServices method:
services
    .AddAuthentication(JwtBearerDefaults.AuthenticationScheme)
    .AddJwtBearer(options =>
    {
        options.TokenValidationParameters = new TokenValidationParameters()
        {
            ValidateIssuer = true,
            ValidateAudience = true,
            ValidateLifetime = true,
            ValidateIssuerSigningKey = true,
            ValidAudience = Configuration["Jwt:Audience"],
            ValidIssuer = Configuration["Jwt:Issuer"],
            IssuerSigningKey = new SymmetricSecurityKey(
                Encoding.UTF8.GetBytes(Configuration["Jwt:Key"])
            )
        };
    });
The call to AddAuthentication includes all the internal core service classes that are needed to do authentication in our app.
The JwtBearerDefaults.AuthenticationScheme parameter that we give it is the name of the authentication scheme to use as the default. More on that later. For now, know that ASP.NET Core supports multiple authentication schemes to be used at the same time. In fact, our own plan here is to eventually support two auth schemes: JWTs and API Keys. We’re starting with JWT first and as such, that’s the one we specify as the default.
The call to AddJwtBearer configures the JWT authentication scheme. That is, it allows the app to perform authentication checks based on an incoming JWT token.
The most important part of the configuration is the values that we are passing to TokenValidationParameters. As you can see, we are able to specify which aspects of the incoming JWTs to validate. You can see all available options for TokenValidationParameters in the official documentation. Here we’ve chosen to validate obvious things like the issuer, audience, and signing key.
The last configuration step is to add this line right before app.UseAuthorization(); in the Configure method:
app.UseAuthentication();
That will enable the authentication middleware. That way the framework will perform authentication checks as part of the request processing pipeline. In other words, actually put all the configuration that we’ve done to good use.
Alright, now that we have all the configuration ready and have secured an endpoint, let’s try hitting it with a GET on api/BodyTypes and see what happens:
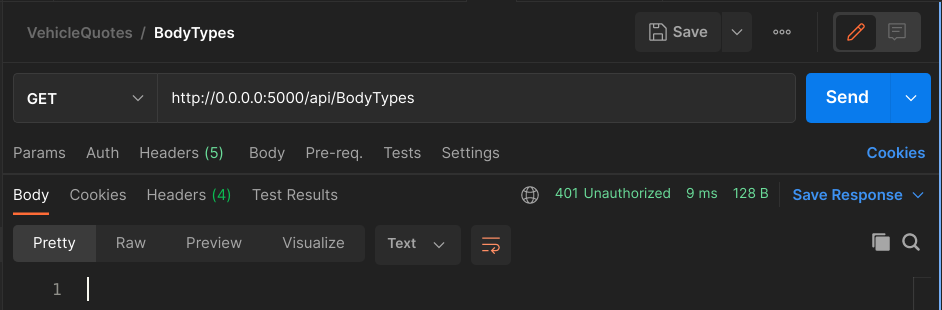
Ok! So far so good. We made an unauthenticated request into an endpoint that requires authentication and as a result we got a 401 back. That’s just what we wanted.
Now, let’s get a token by POSTing to api/Users/BearerToken:
We can copy that token and include as a header in the GET request to api/BodyTypes. The header key should be Authorization and the value should be Bearer <our token>. In Postman, we can setup a similar request if we choose the “Authorization” tab, select “Bearer Token” in the “Type” drop-down list and paste the token in the “Token” text box.
Do that, and you should now see a 200 response from the endpoint:
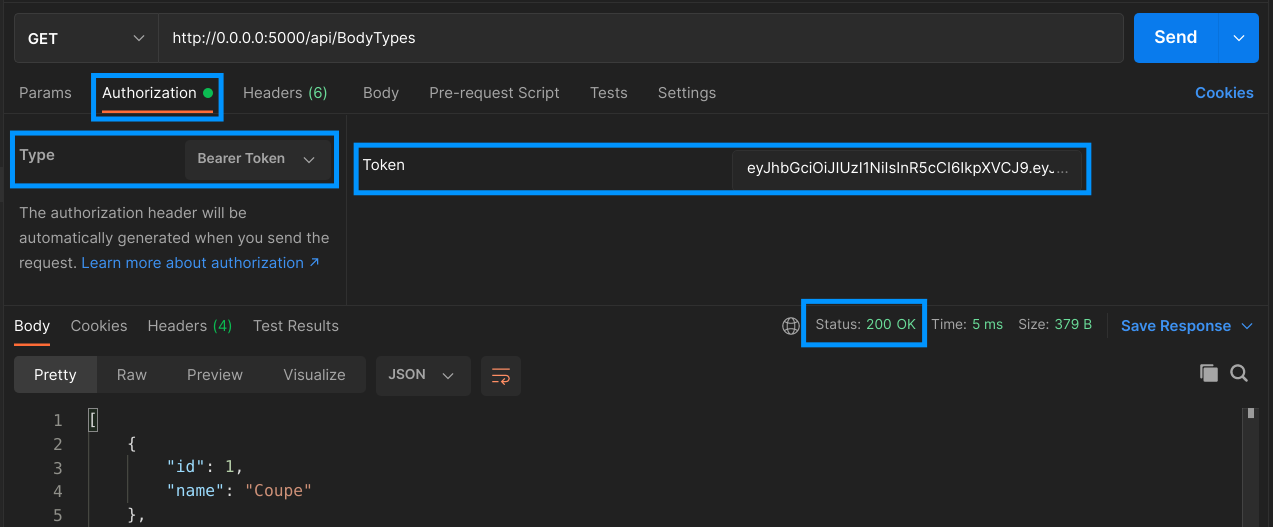
Neat! Now that we passed a valid token, it wants to talk to us again. Let a few minutes pass, enough for the token to expire and try the request again to see how it’s 401’ing again.
Implementing API Key authentication
Now let’s change gears from JWT and implement an alternate authentication strategy in our Web API: API Keys. Authentication with API Keys is fairly common in the web service world.
The core idea of API Keys is that the API provider (in this case, us) produces a secret string that is given to the clients for safekeeping. The clients then can use that key to access the API and make as many requests as they want. So it’s essentially just a glorified password.
The main functional differences when it comes to JWT as we have implemented it is that the API Keys won’t expire and that we will store them in our database. Then, when processing incoming requests, as part of the authentication step, our app will check if the given API Key exists in our internal records. If it does, then the request is allowed to go through, if it does not, then a 401 is sent back.
This is going to be interesting because ASP.NET Core does not include an authentication scheme out of the box for this kind of behavior. For JWT, we were able to use the Microsoft.AspNetCore.Authentication.JwtBearer package. For this we have to get our hands dirty and actually implement a custom authentication handler that will run the logic that we need.
Let’s get started.
Creating API Keys
Similarly to when we implemented JWTs, we’ll start by creating the new endpoint that clients will call to obtain their keys. In order to make it work, we’ll need:
- A new model and database table to store the keys
- A service class to create the keys.
- A new action method in
UsersControllerthat does the work.
The API Key model and database table
For storing API Keys, we just need a simple table that is linked to users via a one-to-many relationship and includes a name and a value. Using Entity Framework, our model could look like this in VehicleQuotes/Models/UserApiKey.cs:
using System.ComponentModel.DataAnnotations;
using System.Text.Json.Serialization;
using Microsoft.AspNetCore.Identity;
using Microsoft.EntityFrameworkCore;

namespace VehicleQuotes.Models
{
    [Index(nameof(Value), IsUnique = true)]
    public class UserApiKey
    {
        [JsonIgnore]
        public int ID { get; set; }

        [Required]
        public string Value { get; set; }

        [JsonIgnore]
        [Required]
        public string UserID { get; set; }

        [JsonIgnore]
        public IdentityUser User { get; set; }
    }
}
Easy enough. We express the relationship between the “keys” and “users” tables via the User navigation property and the UserID field. We also define a unique index on the Value field and annotate some fields with Required because we don’t want them to allow null. Interestingly, we also annotated some of the fields with the JsonIgnore attribute so that when we include objects of this type in API responses (which, as you’ll see, we will), those fields are not included.
We also need to add a new DbSet on our DbContext class at VehicleQuotes/Data/VehicleQuotesContext.cs so that Entity Framework picks it up as part of the data model:
public DbSet<UserApiKey> UserApiKeys { get; set; }
With that, let’s now create and run a migration so that the new table can be added to the database. All it takes is running this to create the migration:
dotnet ef migrations add AddUserApiKeysTable
And this to apply it:
dotnet ef database update
Now the new table should appear in the database:
vehicle_quotes=# \dt
                    List of relations
 Schema |         Name          | Type  |     Owner
--------+-----------------------+-------+----------------
...
 public | user_api_keys         | table | vehicle_quotes
 (15 rows)
The class that creates API Keys
The next step is very straightforward. All we need is some logic that, when given a user account (in the form of an instance of IdentityUser), can generate a new API Key, insert it in the database, and return it. The following unremarkable class, defined in VehicleQuotes/Services/ApiKeyService.cs, encapsulates said logic:
using System;
using Microsoft.AspNetCore.Identity;
using VehicleQuotes.Models;

namespace VehicleQuotes.Services
{
    public class ApiKeyService
    {
        private readonly VehicleQuotesContext _context;

        public ApiKeyService(VehicleQuotesContext context)
        {
            _context = context;
        }

        public UserApiKey CreateApiKey(IdentityUser user)
        {
            var newApiKey = new UserApiKey
            {
                User = user,
                Value = GenerateApiKeyValue()
            };

            _context.UserApiKeys.Add(newApiKey);

            _context.SaveChanges();

            return newApiKey;
        }

        private string GenerateApiKeyValue() =>
            $"{Guid.NewGuid().ToString()}-{Guid.NewGuid().ToString()}";
    }
}
As you can see, this class’s single public method, aptly named CreateApiKey, just takes the given user and creates a new UserApiKey that’s associated with it and saves it into the database. The key values themselves are just two GUIDs concatenated.
This is an admittedly simplistic and not-all-that-secure method for generating the keys themselves. For simplicity, we’ve gone with this. In a production app however, it’d be better to use a true cryptographically secure string. Here’s an article that explains how to do that with .NET.
Naturally, this class needs to be used elsewhere in the application, so let’s make it available for Dependency Injection by adding the following line to VehicleQuotes/Startup.cs’s ConfigureServices method.
services.AddScoped<Services.ApiKeyService>();
The action method that puts it all together
Now let’s finally write a new action method on VehicleQuotes/Controllers/UsersController.cs so that there’s an endpoint that clients can call to get API Keys. Before adding the action method though, as usual, we need to declare the following dependency as a constructor parameter and hold it in an instance variable:
 public class UsersController : ControllerBase
 {
     private readonly UserManager<IdentityUser> _userManager;
     private readonly JwtService _jwtService;
+    private readonly ApiKeyService _apiKeyService;

     public UsersController(
         UserManager<IdentityUser> userManager,
         JwtService jwtService,
+        ApiKeyService apiKeyService
     ) {
         _userManager = userManager;
         _jwtService = jwtService;
+        _apiKeyService = apiKeyService;
     }}
The action method itself would look like this:
// POST: api/Users/ApiKey
[HttpPost("ApiKey")]
public async Task<ActionResult> CreateApiKey(AuthenticationRequest request)
{
    if (!ModelState.IsValid)
    {
        return BadRequest(ModelState);
    }

    var user = await _userManager.FindByNameAsync(request.UserName);

    if (user == null)
    {
        return BadRequest("Bad credentials");
    }

    var isPasswordValid = await _userManager.CheckPasswordAsync(user, request.Password);

    if (!isPasswordValid)
    {
        return BadRequest("Bad credentials");
    }

    var token = _apiKeyService.CreateApiKey(user);

    return Ok(token);
}
This method is very similar to the other one that generates JWTs. Painfully so. In fact the only difference is that this one calls the ApiKeyService’s CreateApiKey method instead of JwtService’s CreateToken, for obvious reasons.
These two are ripe for some refactoring to eliminate duplication but we won’t do that here. Take a look at the finished project on GitHub to see a neat refactoring option.
Anyway, you can now try a POST into api/Users/ApiKey, pass it a valid set of credentials, and you should see it respond with a brand new API Key:
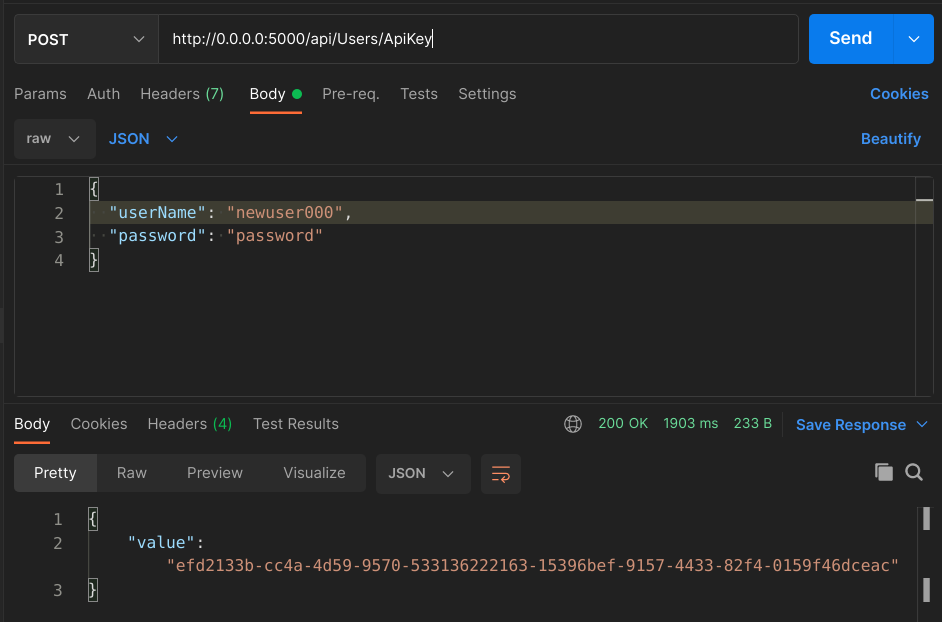
The key can also be found in the database:
vehicle_quotes=# select id, SUBSTRING(value,1,13), user_id from user_api_keys;
 id |   substring   |               user_id
----+---------------+--------------------------------------
  1 | efd2133b-cc4a | aaad07b4-f109-4255-8caa-185fd7694c72
(1 row)
Securing an endpoint with API Key authentication
Now that users have a way of getting API Keys, we can start securing endpoints with that authentication scheme. In order to acomplish that, we need to take three steps:
- Implement a custom authentication handler that runs the authentication logic.
- Configure the new authentication handler, plugging it into ASP.NET Core’s auth mechanisms.
- Secure certain endpoints via the Authorization attribute, specifying the scheme that we want to use to do so.
We’ll do that next.
Implementing the API Key authentication handler
Like we’ve touched on before, the “authentication handler” is a class that can plug into ASP.NET Core’s authentication middleware and can run the authentication logic for a given authentication scheme. In practical terms, it’s a class that inherits from Microsoft.AspNetCore.Authentication.AuthenticationHandler and implements the HandleAuthenticateAsync method. Ours will live in VehicleQuotes/Authentication/ApiKey/ApiKeyAuthenticationHandler.cs and it looks like this:
using System.Security.Claims;
using System.Text.Encodings.Web;
using System.Threading.Tasks;
using Microsoft.AspNetCore.Authentication;
using Microsoft.AspNetCore.Identity;
using Microsoft.EntityFrameworkCore;
using Microsoft.Extensions.Logging;
using Microsoft.Extensions.Options;

namespace VehicleQuotes.Authentication.ApiKey
{
    class ApiKeyAuthenticationHandler : AuthenticationHandler<AuthenticationSchemeOptions>
    {
        private const string API_KEY_HEADER = "Api-Key";

        private readonly VehicleQuotesContext _context;

        public ApiKeyAuthenticationHandler(
            IOptionsMonitor<AuthenticationSchemeOptions> options,
            ILoggerFactory logger,
            UrlEncoder encoder,
            ISystemClock clock,
            VehicleQuotesContext context
        ) : base(options, logger, encoder, clock)
        {
            _context = context;
        }

        protected override async Task<AuthenticateResult> HandleAuthenticateAsync()
        {
            if (!Request.Headers.ContainsKey(API_KEY_HEADER))
            {
                return AuthenticateResult.Fail("Header Not Found.");
            }

            string apiKeyToValidate = Request.Headers[API_KEY_HEADER];

            var apiKey = await _context.UserApiKeys
                .Include(uak => uak.User)
                .SingleOrDefaultAsync(uak => uak.Value == apiKeyToValidate);

            if (apiKey == null)
            {
                return AuthenticateResult.Fail("Invalid key.");
            }

            return AuthenticateResult.Success(CreateTicket(apiKey.User));
        }

        private AuthenticationTicket CreateTicket(IdentityUser user)
        {
            var claims = new[] {
                new Claim(ClaimTypes.NameIdentifier, user.Id),
                new Claim(ClaimTypes.Name, user.UserName),
                new Claim(ClaimTypes.Email, user.Email)
            };

            var identity = new ClaimsIdentity(claims, Scheme.Name);
            var principal = new ClaimsPrincipal(identity);
            var ticket = new AuthenticationTicket(principal, Scheme.Name);

            return ticket;
        }
    }
}
The first thing to note is how we’ve defined the base class: AuthenticationHandler<AuthenticationSchemeOptions>. AuthenticationHandler is a generic, and it allows us to control the type of options object that it accepts. In this case, we’ve used AuthenticationSchemeOptions, which is just a default one already provided by the framework. This is because we don’t really need any custom options.
If we did, then we would define a new class that inherits from
AuthenticationSchemeOptions, give it the new fields that we need, and use that as a generic time parameter instead. We would then be able to set values for these new fields during configuration in the app’sStartupclass. Just like we’ve done with the “Jwt Bearer” auth scheme via theAddJwtBearermethod.
The next point of interest in this class is its constructor. The key aspect of it is that it calls base and passes it a series of parameters that it itself gets. This is because AuthenticationHandler does have some constructor logic that needs to be run for things to work properly, so we make sure to do that.
Finally, there’s the HandleAuthenticateAsync method which does the actual authentication. This method inspects the incoming request looking for an “Api-Key” header. If it finds it, it takes its value and makes a query into the database to try and find a record in the user_api_keys table that matches the incoming value. If it finds that, it creates an AuthenticationTicket which contains the identity of the user that the key belongs to, and returns it wrapped in a AuthenticateResult.Success. That return value signals ASP.NET Core’s authentication middleware that the request is authentic. Otherwise, it returns AuthenticateResult.Fail, which prompts ASP.NET Core to halt the request and return a 401.
Something interesting to note is how the AuthenticationTicket, similarly to the JWT Bearer scheme’s JwtSecurityToken, also includes an array of “claims” that serve to identify the user that has been authenticated. The “claims” concept is central to how auth works in ASP.NET Core.
Enabling and configuring the API Key authentication
Now we need to tell the framework that we want it to use a new authentication scheme for our app, spearheaded by the custom authentication handler that we just wrote. There are two steps to make that happen.
First, we configure our new scheme in the app’s Startup class. For that, we need these two new using statements:
using Microsoft.AspNetCore.Authentication;
using VehicleQuotes.Authentication.ApiKey;
Then we add this right after the AddJwtBearer call in the ConfigureServices method:
 public void ConfigureServices(IServiceCollection services)
 {
     // ...
     services
         .AddAuthentication(JwtBearerDefaults.AuthenticationScheme)
         .AddJwtBearer(options =>
         {
             options.TokenValidationParameters = new TokenValidationParameters()
             {
                 ValidateIssuer = true,
                 ValidateAudience = true,
                 ValidateLifetime = true,
                 ValidateIssuerSigningKey = true,
                 ValidAudience = Configuration["Jwt:Audience"],
                 ValidIssuer = Configuration["Jwt:Issuer"],
                 IssuerSigningKey = new SymmetricSecurityKey(
                     Encoding.UTF8.GetBytes(Configuration["Jwt:Key"])
                 )
             };
         })
+        .AddScheme<AuthenticationSchemeOptions, ApiKeyAuthenticationHandler>(
+            "ApiKey",
+            options => { }
+        );
 }
A simple configuration as far as auth schemes go. We specify both the types of the authentication handler and the options object that it accepts via the generic type parameters to the AddScheme method. "ApiKey" is just the name we’ve given our custom auth scheme. It can be anything as long as it’s not “Bearer”, which is the name of the Jwt Bearer scheme (which is the value returned by JwtBearerDefaults.AuthenticationScheme). We’ll refer back to it later. Finally, since we have no special options to give it, we specify a lambda that does nothing with its options.
Updating the Authorize attribute to use our two schemes
Now that the auth scheme is configured, we need to use it to secure an endpoint. We can use the same that we used for JWT: POST api/BodyTypes, defined in BodyTypesController’s GetBodyTypes action method. Remember though, that we wanted to have both auth schemes (JWT and API Key) work on the endpoint. For that, the Authorize attribute allows a comma separated string of scheme names as a parameter. So, we can get both our configured schemes working if we update the attribute like this:
[Authorize(AuthenticationSchemes = $"{JwtBearerDefaults.AuthenticationScheme},ApiKey")]
public async Task<ActionResult<IEnumerable<BodyType>>> GetBodyTypes()
{
    return await _context.BodyTypes.ToListAsync();
}
JwtBearerDefaults.AuthenticationScheme contains the name of the JWT Bearer auth scheme. Next to it, we just put “ApiKey”, which is the name we have given our new custom one.
It’d be nice to put that “ApiKey” string somewhere safe similar to how the “Jwt Bearer” scheme has it in a constant. Take a look at the finished project on GitHub to see one way to organize that and also how to make the
Startupconfiguration a little less verbose by using extension methods.
And finally, let’s test our endpoint and marvel at the fruit of our work.
Make sure to create a new API Key by POSTing to api/Users/ApiKey, and copy the “value” from the response. We can use it as the value for the Api-Key header a GET request to api/BodyTypes. In Postman, we can do that by choosing the “Authorization” tab, selecting “API Key” in the “Type” drop-down list, writing “Api-Key” in the “Key” text box, and putting our key in the “Value” text box.
With that, we can make the request and see how the endpoint now allows authentication via API Keys:

Of course, requests authenticated via JWT will also work for this endpoint.
That’s all
And there you have it! We’ve updated an existing ASP.NET Core Web API application so that it supports authentication using two strategies: JWT and API Keys. We leveraged the Identity libraries to securely store and manage user accounts. We used ASP.NET Core’s built-in authentication capabilities to enable JWT generation and usage. For API Keys, the framework didn’t provide an implementation out of the box. However, it proved to be extensible enough so that we could implement our own.
Table of contents
- Two approaches to authentication: JWT and API Keys
- Managing user accounts with ASP.NET Core Identity
- Implementing JWT Bearer Token authentication
- Implementing API Key authentication
- That’s all
authentication security dotnet aspdotnet
Comments